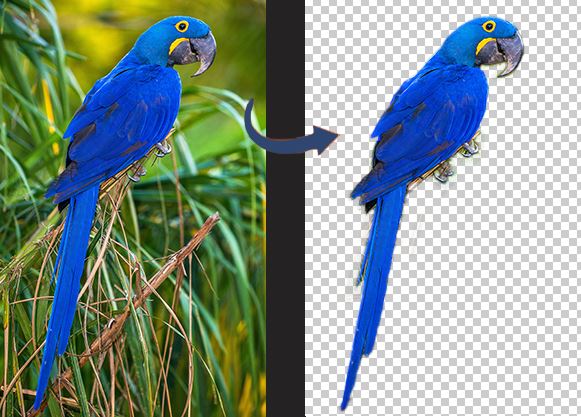
Have you ever struggled for hours, painstakingly removing the background of an image pixel by pixel? Perhaps you’re used to using the Eraser Tool to do it the “manual” way, like I did while creating the featured main image for this article (that method takes a while). There’s a better way to remove the background of photos, images or illustrations. In fact there are at least 3 better ways! Let’s dive in and explore how to delete that pesky background.
This tutorial was done using Adobe Photoshop 2021, version 22.5.1 on a Windows PC.
How to Remove the Background From an Image Using Adobe Photoshop (3 Ways)
1st Way: the Magic Wand Tool
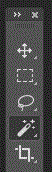
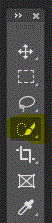
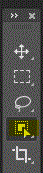
- Open your image, illustration or photo in Photoshop. In my view I can see a long vertical menu of different tools along the left side of my Photoshop screen. Go to that menu and click on the Magic Wand Tool, which looks like a stick (or wand) with tiny stars around it:
- Use your Magic Wand tool to select the main focal point – or the main subject of your image. Click somewhere near the center of the main subject to start, then you can to fine-tune your selection by adding to it or removing bits and pieces from it. To do this you could right-click (while still having the Magic Wand selected) and choose either “Add To Selection” or “Subtract From Selection”, depending upon your needs. Alternately, you could hold down the Shift key and click on the image to add to what’s selected, or hold down the Alt key and click on the image to subtract from what’s selected.
- Once you’ve got all of the necessary bits and pieces surrounded by the marching ants, and are satisfied with your selection, go up to the other Photoshop main menu (way at the top) and choose Select, then scroll down to “Inverse”. Now everything ELSE but your subject should appear as selected (with the dotted lines and marching ants all around it).
- To finish up, hit the Delete key to remove that whole selected area. Hopefully now your subject is all that remains and the rest of your canvas is blank.
If your image subject mostly contains pixels that are close to the same color or hue (perhaps a flat color), and those same-colored pixels are all in the same spot, then you could keep “Contiguous” checked up in this little menu area:

Keeping that option checked with make sure the Magic Wand selects only those same-colored pixels that are right next to each other. If your image contains a subject that isn’t all in one place (the pixels are separated by other stuff that you don’t want selected), then you can un-check “Contiguous”.
This helpful YouTube video by Adobe explains it quite well: Learn how to use the Magic Wand tool to make Selections in Photoshop.
That video also explains what the “Tolerance” option is and when it would be best to set that at a higher number VS a lower number. In my quest to only select the blue parrot portion of my image — after some experimenting — I landed on a Tolerance level of 57.
2nd Way: the Quick Selection Tool:
- Open your image, illustration or photo in Photoshop. Look in the menu of different tools along the left side of your Photoshop screen. Go to that menu and click on the Quick Selection Tool, which looks like a paintbrush on top of some circular dotted lines. It might be hiding behind the Magic Wand Tool; in that case click on the Magic Wand and hold for 1 – 2 seconds until a little sub-menu of tools pops open, then click on the Quick Selection Tool:

- Your mouse pointer should now have turned into a circle with a “+” symbol inside it. Click and drag onto your image to select the main subject of your image. Proceed to complete your selection by clicking (or clicking & dragging) onto other parts of it (still using the Quick Selection tool).
Keep clicking until the entire subject is selected. Continue adding to it or removing bits and pieces from it as needed to capture fine details.
I had the “Enhance Edge” option checked at the time, when I was making my selection. This option seems to result in a more accurate selection and snaps the marching ants closer to the edges. (I’m not sure when it would be useful to not have “Enhance Edge” checked though).
- For another way to add or subtract from the selected area, there are some handy-dandy brushes available near the top of the PS screen that look like this:

- These brushes should appear if you click on the Quick Selection brush or tool, which is located as one of the 3 options in that same section of the menu (the other options being the “Magic Wand” and the “Object Selection” tools):
Choose either the “Add to selection” or “Subtract from selection” brush, depending upon your needs. Alternately to clicking & dragging, you could hold down the Shift key and click on the image to add to what’s selected, or hold down the Alt key and click on the image to subtract from what’s selected.
It’s also useful to play around with the brush size to see what works best and gives you the most detailed results.
- Once you are satisfied with your selection you can do either of the following:
- While still using the Quick Selection Tool, right-click your mouse, then choose “Select and Mask…“.
It might take a little tweaking to further refine your selection and remove all of the background from the surrounding parts of your image. - Go up to the regular Photoshop main menu (way at the top) and choose Select, then scroll down to “Inverse”. Now everything ELSE but your subject should appear as selected (with the dotted lines and marching ants all around it).
- While still using the Quick Selection Tool, right-click your mouse, then choose “Select and Mask…“.
- To finish up, hit Delete on your keyboard to remove that whole selected area. Hopefully now your subject is all that remains and the rest of your canvas is blank.
NOTE: this tool didn’t work for me at first because I started out using a GIF, which apparently is an “Indexed Color” image. But I was able to use the Quick Selection Tool after going up to Select > All and doing a “Copy/Paste” to create a new image from my clipboard. Alternately I could have converted to a workable color mode by going up to Image > Mode then choosing “RGB Color”.
Check out the fantastic deals that Adobe offers here. There are many different affordable plans available so you can get started editing photos, creating illustrations, or designing whatever your imagination can come up with. You can get started on as little as $9.99/month!
3rd Way: the Object Selection Tool
- Open your image in Photoshop. Look in the menu of different tools along the left side of your Photoshop screen. Go to that menu and click on the Object Selection Tool, which looks like a tiny square surrounded by a dotted outline. It might be hiding behind the Magic Wand Tool; in that case click on the Magic Wand and hold for 1 – 2 seconds until a little sub-menu of tools pops open, then click on the Object Selection Tool:
- Your mouse pointer should now have turned into a big “+” symbol with a little square next to it. Click and drag onto your image to select the main subject of your image. Once your selected area covers your entire subject release your mouse. At first a larger area might appear to be selected within a square, then it might take Photoshop a few seconds to “think about” how to select your subject – then finally it snaps itself to what it determines to be the main focal point of the image.
- I had “Rectangle” selected from the drop-down menu for “Mode” and that seemed to work fine. There’s also an option to choose “Lasso” but I’m not sure when/if it would be better to choose that instead of the rectangle. To be honest I found using the Lasso feature a bit cumbersome and it took longer than using the rectangle selector.
In that same little menu area there are also options for “Add to selection” or “Subtract from selection” or “Intersect with selection”:

- Keep clicking until the entire subject is selected. Continue adding to it or removing bits and pieces from it as needed to capture fine details.
I had the “Enhance Edge” option checked at the time, when I was making my selection. This option seems to result in a more accurate selection and snaps the marching ants closer to the edges. (I’m not sure when it would be useful to not have “Enhance Edge” checked though). - For another way to add or subtract from the selected area, there are some handy-dandy brushes available near the top of the PS screen that look like this:
- These brushes should appear if you click on the Quick Selection brush or tool, which is located as one of the 3 options in that same section of the menu (the other options being the “Magic Wand” and the “Object Selection” tools):
Choose either the “Add to selection” or “Subtract from selection” brush, to touch up your selection depending upon your needs. Alternately to clicking & dragging, you could hold down the Shift key and click on the image to add to what’s selected, or hold down the Alt key and click on the image to subtract from what’s selected.
It’s also useful to play around with the brush size to see what works best and gives you the most detailed results. - Once you are satisfied with your selection you can do either of the following:
- While still using the Quick Selection Tool, right-click your mouse, then choose “Select and Mask…“.
It might take a little tweaking to further refine your selection and remove all of the background from the surrounding parts of your image. - Go up to the regular Photoshop main menu (way at the top) and choose Select, then scroll down to “Inverse”. Now everything ELSE but your subject should appear as selected (with the dotted lines and marching ants all around it).
- While still using the Quick Selection Tool, right-click your mouse, then choose “Select and Mask…“.
- To finish up, hit Delete on your keyboard to remove that whole selected area. Hopefully now your subject is all that remains and the rest of your canvas is blank.
Read our latest tutorial on this same topic (removing image backgrounds), using the Select and Mask tool/method. 🙂
And here’s another tutorial that you might want to check out, on the subject of How to Turn a Photo Into an Illustration Using Photoshop.
I hope you found this tutorial useful – please share it if you did, and thanks for reading!