This is the 2nd in a three-part series of tutorials on how to remove or delete the background of an image using Adobe Photoshop (the 3rd article is coming soon). There are many different ways of achieving the desired results — getting rid of the unwanted background of an image or photo, so these are only but a few.
Here’s a quick link to easily access the 1st related tutorial, which details 3 of the ways to do this:
How to Remove the Background From an Image Using Adobe Photoshop (3 Ways)
How to Remove the Background from an Image in Photoshop using the Select and Mask Tool
This is the second method in this series, and it’s a slightly newer and quicker way of doing this than using the first method that utilizes the Photoshop Magic Wand Tool.
- Open your image, illustration or photo in Photoshop. My starting photo is a snapshot (JPG) from that old film of “Bigfoot” from October 1967, taken in California by Roger Patterson and Bob Gimlin:
This type of image is grainy and visually very busy with tons of little details and few areas of solid, flat color. So in other words, I would recommend starting with an image that is more simple and is easier to work with! I chose this because I’ve always been a bit fascinated with myths and legends like Bigfoot, the Loch Ness monster, Mothman, etc.
- Next go up to the top main Photoshop menu and click on Select, then scroll down to “Select and Mask” and choose that option.
This is how good ol’ Bigfoot looks after he has a Mask applied over the top of him:
- Now that your image is in Mask mode you should see a bunch of different Properties and options surrounding your center work area. These are tool-specific options so you can now fine-tune your mask selection.
- The next step is to go to the top menu and again click on Select, then scroll down to “Subject” and choose that option. It might take a minute for Photoshop to work its magic and finalize its selection of (what it thinks is) the main subject of your photo.
Hot tip from the Dragon:
 like many Photoshop features and effects, the full range of Mask options do not seem to work on GIF or “Indexed Color” files. However, in this case you should be able to go to “Select“, scroll down to “Edit in Quick Mask Mode” and choose that option. Here is a nice help article from Adobe on this subject: Create a temporary quick mask.
I must say I was pleasantly surprised at how Photoshop figured out how to isolate just the Bigfoot figure from that messy, blurry background! This is what it came up with for my main subject:
You might need to touch up the selection that Photoshop has generated, since it probably won’t be 100% accurate (but still pretty darn good!) I had to do a little bit of touching-up, like to his head, but not a whole lot.
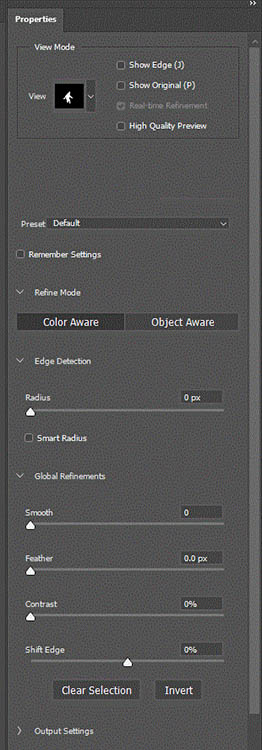
- To check the selection for accuracy – before you “commit” to it by clicking the “OK” button – go over to the Properties menu over to the right of your PS screen (in my view anyway) and look at the View Mode > View menu. It should appear as a little square box with a down arrow next to it, as shown here near the top:
In that little “View” box area click on the down arrow.
There are a few different ways to view the selection more closely, such as choosing:
Marching Ants
Overlay
Black on White
On Layers (against a transparent background)Viewing the masked, selected area this way should help you to see the exact outline of what the selection will be prior to committing to it.
-
To touch up the tiny details of your mask selection:
At any point you can go over to the left menu and choose the Quick Selection Tool, then choose either the plus (+) or minus (-) symbol near the top of the Photoshop screen:
- Then brush onto your canvas to add to or subtract from your selected object. You can also adjust the size of the touch-up brush by entering a number into that little “Size” box.
- Play around with the sliders for Smooth, Contrast, Feather and Shift Edge to find out which settings work best for your particular image and selection. Here’s what my Mask selection looked like when I chose the “Black & White” option under “View“:

As I mentioned above, it needed a little touch-up (just those 2 areas highlighted above), but for the most part the selection was fairly accurate.
Note: with black set as the foreground color, you can drag the brush around and subtract bits, and with a white foreground color, you can drag your brush around to add bits back into the selection/mask.
- You can click the “Remember Settings” box if you’d like to be able to easily repeat this masking and selection process in the future. This specific option is located near the top of the Mask Properties menu.
-
Once you are satisfied that you have all of the important little pieces of your subject selected:
Go down to “Output Settings” and click the little down arrow to reveal the options there. Choose “Layer Mask” and click “OK.”
- At this stage you should see your selection on the center screen/canvas in front of you. It should now be isolated all by itself and nicely separated from the image background!
- Note: you should still have your original image intact on a separate layer just in case you still need to refer to it (cool!)
- If you’d like to go back and fix your layer mask or tweak it in any way, simply click on it in the Layers menu to select it. Then use the Brush tool to add to or subtract from your selection. I had to touch up his leg at this point.
- To commit the selection, remove the background from your menu entirely and begin working on your ‘new’ image. To do this: in the Layers menu click on the layer containing the masked selection and the original background:
Then right-click to open a big long menu of options and choose “Flatten Image.” Now you can edit the image as you’d like – without the background in the way!
By the way, I wound up taking my Bigfoot cutout/selection/image and turning it into a t-shirt design (waste not, want not, right?) Here’s the finished design if you would like to take a glance!