When I was first learning HTML and CSS early in my career, this is one of the subjects that took a while to sink into my brain. I kept getting confused about when to use the CSS “margin” property versus when to use the “padding” property, as both appeared to create space between the HTML elements I was working with.
One thing that would have helped me to learn the difference more quickly would have been to understand this simple fact:
It all revolves around the CSS “border” property.
The border of an HTML element is the area surrounding it on all four sides, and that border area can be altered in different ways: you can change its style, color and width (thickness).
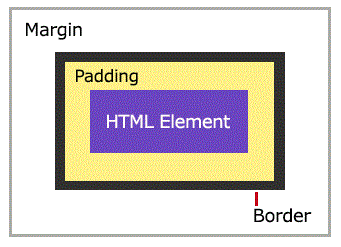
Simply put, the area outside of the border is the margin. The area inside the border is the padding.
The border, margin and padding properties are all part of the CSS Box Model. The CSS Box Model is one of the most important aspects of CSS and HTML, and it’s important to understand how it works. Let’s take a closer look at the Box Model through the following illustration:

The browser looks at every piece of a webpage within the context of a box, and views everything (even images) as being contained within the framework of an invisible box. That’s why it’s so important to understand the Box Model first, in order to then understand how margin and padding work.
Sample code to add a margin and some padding
This is an example of how you might code your CSS for both margin and padding (this code creates a shaded rectangular box):
<style>#exampleBox {

  background-color: lightgray;

  border: 2px solid #48355B;

  padding: 20px;

  margin: 15px;

}</style>
Create an ID, assign some padding and margin values to it, then reference that same ID within an HTML element. In this case we referenced the “exampleBox” ID from inside two “div” tags:
<div id="exampleBox">Here is my content, text, image or other element. This box contains 20 pixels of padding around the text and 15 pixels of margin outside of the border area.</div>
The code above uses the “style” HTML tag to wrap around the CSS, and can be added directly to your webpage. This is one way of referencing CSS code from a page, but it’s preferable to link to a CSS file that is housed in one central location on your server. Then you should link to it from every page on your website via a link up in the <head> section.
The following article contains more details on this topic, including How to Use Inline CSS on Your Blog or Website.
Here are a few examples of CSS padding and CSS margin in action:
To specify different margin values, use CSS similar to this: “margin: 20px 50px 15px 40px;”. That code targets the margins (space outside of the border) in this order: top, right, bottom, left.
We’re using no padding around the text here.
Just like with the margin property, the padding is applied to all four sides of the box, by using simply “padding: 30px;” as the CSS. To specify different padding values, use CSS similar to this: “padding: 20px 30px 15px 40px;”. That code targets the area between an element and its surrounding border in this order: top, right, bottom, left.
You can use negative margins but can’t use negative padding.
Negative margins are a relatively under-utilized and not often mentioned technique for positioning elements on a page. If you really want to delve into that subject and do some experimenting of your own in this area, Smashing Magazine covers it all in their article The Definitive Guide to Using Negative Margins.
The box below is just one example of how using negative margin values could affect the areas surrounding the element [that has the negative margin applied to it]. The following box was created by using the HTML div element, and applying this CSS to it via a CSS ID: margin: -25px;.
Here is some extra text to illustrate how a top negative margin might appear.
Here is some extra text to illustrate how a bottom negative margin might appear. Like the text in bold above, this text was written outside of the DIV element.
This technique should be used sparingly, as the use of negative margins could throw off the alignment of other elements and text on your page.
Well, there you have it! This was a brief look into padding and margin properties of CSS. The most important distinction is — to reiterate what we mentioned in the beginning of this article — the area outside of the border is the margin and the area inside the border is the padding.
For further reading and learning about CSS, please check out our articles:
What is a CSS Pseudo Class?
What is a CSS Pseudo Element?
Good luck with your coding and design efforts, and thank you for reading! 🙂


