If you are in the process of building a WordPress website or blog and don’t want to take a chance that it can be seen by the viewing public, there are a few options available to you:
- You can build the site on a staging server. If you contact your web hosting company, they can set that up for you fairly quickly. Web hosts often set up staging servers and temporary staging domains with something like “new” in front of your existing domain (if you are redesigning an existing website).
For example, if I were to redesign this blog, I might want to call my temporary website “new.codedragontech.com/createwithcodedragon/” . - You can put up an under construction or “Coming Soon” type of page until your website or blog is ready.
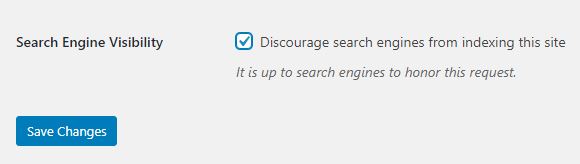
- For an added measure of assurance that your site will remain hidden until you’re ready, go to the main menu in your WordPress dashboard and look under Settings > Reading.
Scroll down to where it says “Search Engine Visibility” and check that box to hide your site from search:
- You can keep individual pages or posts hidden from the public. This is done by going into the page or post to open it, then looking over to the right, under the “Publish” menu. Near the item called “Visibility” there will be an Edit link – click on that to open a little sub-menu:
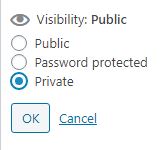
Choose the “Private” option, then click the OK button. Doing this will ensure the page is not visible to anyone on the live (Production) server. However, if you still would like to make a page live but only have it be visible to specific people, then choose the “Password protected” option here, then click OK. - If you would like to really make sure your website-in-progress is not visible to the public, you can password-protect the entire thing. I ran into this situation recently and looked around at various WordPress plugins, and finally decided upon giving this plugin a try:
Password Protected by Ben Huson. This process was very quick and painless and I had a good experience with this plugin. There’s even the option to allow WordPress Administrators to access your site without having to enter a password.
To get the ball rolling, all you need to do is as follows:— In your WordPress dashboard menu, go to Plugins > Add New
— In the search bar near the top, type in the plugin name (“password protected”)
— Choose that plugin, click Install and then Activate
— You should now see this plugin listed under your list of plugins:

It should also now be visible under the dashboard menu under Settings. Click on “Password Protected” under Settings to access the different options and to set up a password. Make sure to click the “Enabled” box, then create a password, save your changes and you should be good to go!
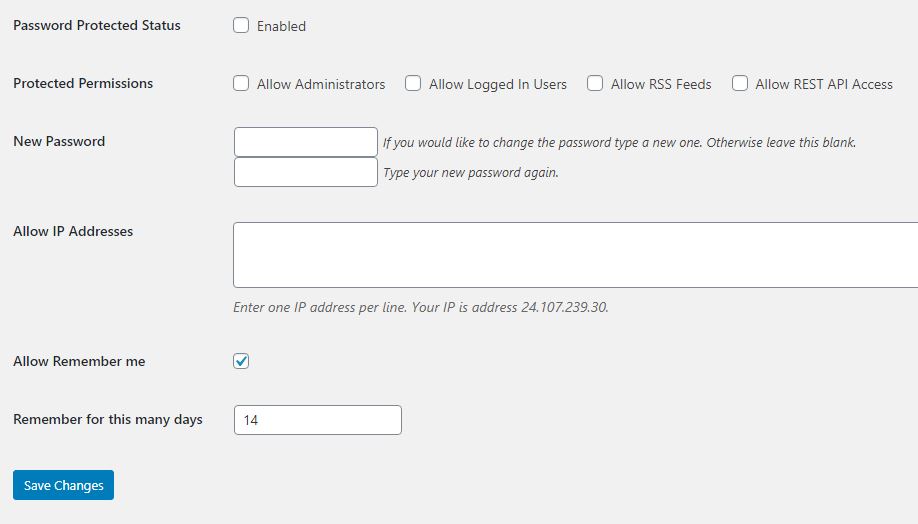
When your website or blog is ready to be seen by the public, simply un-check the “Enabled” box to remove the password-protection feature.
Once you’ve launched your new website, it will be important to keep it secure and protected from hackers. Check out this article to learn about why any website or blog needs to be housed on a secure server.